最近公司有一个新的项目,项目框架是我来负责搭建的,所以果断选择了Vue3.x+ts。vue3.x不同于vue2.x,他们两的插件封装方式完全不一样。由于项目中需要用到自定义提示框,所以想着自己封装一个。vue2.x提供了一个vue.extend的全局方法。那么vue3.x是不是也会提供什么方法呢?果然从vue3.x源码中还是找到了。插件封装的方法,还是分为两步。
# 1、组件准备
按照vue3.x的组件风格封装一个自定义提示框组件。在props属性中定义好。需要传入的数据流。
<template>
    <div v-show="visible" class="model-container">
      <div class="custom-confirm">
        <div class="custom-confirm-header">{{ title }}</div>
        <div class="custom-confirm-body" v-html="content"></div>
        <div class="custom-confirm-footer">
          <Button @click="handleOk">{{ okText }}</Button>
          <Button @click="handleCancel">{{ cancelText }}</Button>
        </div>
      </div>
    </div>
</template>
1
2
3
4
5
6
7
8
9
10
11
12
2
3
4
5
6
7
8
9
10
11
12
<script lang="ts">
import { defineComponent, watch, reactive, onMounted, onUnmounted, toRefs } from "vue";
export default defineComponent({
  name: "ElMessage",
  props: {
    title: {
      type: String,
      default: "",
    },
    content: {
      type: String,
      default: "",
    },
    okText: {
      type: String,
      default: "确定",
    },
    cancelText: {
      type: String,
      default: "取消",
    },
    ok: {
      type: Function,
    },
    cancel: {
      type: Function,
    },
  },
  setup(props, context) {
    const state = reactive({
      visible: false,
    });
    function handleCancel() {
      state.visible = false;
      props.cancel && props.cancel();
    }
    function handleOk() {
      state.visible = false;
      props.ok && props.ok();
    }
    return {
      ...toRefs(state),
      handleOk,
      handleCancel,
    };
  },
});
</script>
1
2
3
4
5
6
7
8
9
10
11
12
13
14
15
16
17
18
19
20
21
22
23
24
25
26
27
28
29
30
31
32
33
34
35
36
37
38
39
40
41
42
43
44
45
46
47
48
2
3
4
5
6
7
8
9
10
11
12
13
14
15
16
17
18
19
20
21
22
23
24
25
26
27
28
29
30
31
32
33
34
35
36
37
38
39
40
41
42
43
44
45
46
47
48
# 2、插件注册
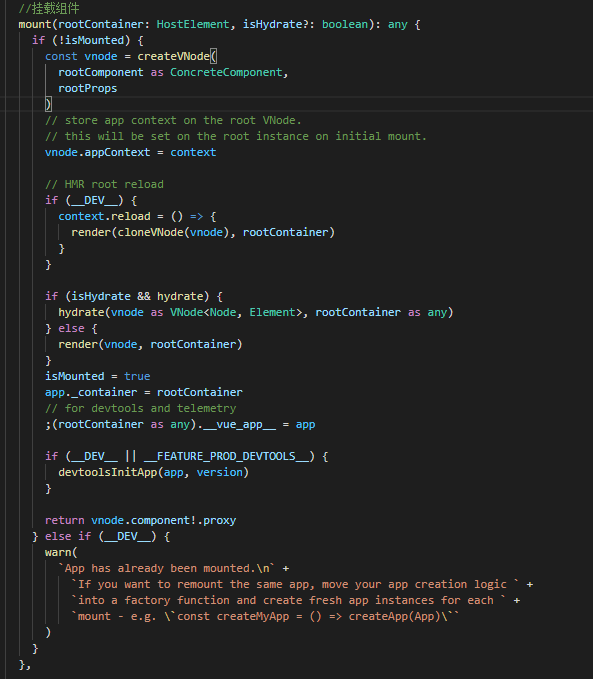
这个才是插件封装的重点。不过代码量非常少,只有那么核心的几行。主要是调用了vue3.x中的createVNode创建虚拟节点,然后调用render方法将虚拟节点渲染成真实节点。并挂在到真实节点上。本质上就是vue3.x源码中的mount操作。
import { createVNode, render } from 'vue';
import type {App} from "vue";
import MessageConstructor from './index.vue'
const body=document.body;
const Message: any= function(options:any){
  const modelDom=body.querySelector(`.container_message`)
    if(modelDom){
      body.removeChild(modelDom)
    }
    options.visible=true;
    const container = document.createElement('div')
    container.className = `container_message`
    //创建虚拟节点
    const vm = createVNode(
      MessageConstructor,
      options,
    )
    //渲染虚拟节点
    render(vm, container)
    document.body.appendChild(container);
}
export default {
    //组件祖册
    install(app: App): void {
        app.config.globalProperties.$message = Message
    }
}
1
2
3
4
5
6
7
8
9
10
11
12
13
14
15
16
17
18
19
20
21
22
23
24
25
26
27
2
3
4
5
6
7
8
9
10
11
12
13
14
15
16
17
18
19
20
21
22
23
24
25
26
27
插件封装完整地址 (opens new window)。源码位置————packages/runtime-core/src/apiCreateApp中的createAppAPI函数中的mount方法。