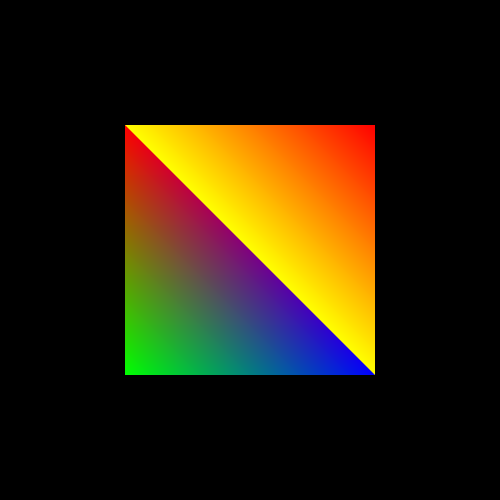
绘制矩形的方式多种多样。以下是我总结的5中绘制方式。矩形的绘制是在三角形的基础上进行绘制的。所以代码没有多大改动,唯一的区别在于构造数据时,需要的顶点个数不同。
- 顶点着色器代码
<script id="vertexShader" type="x-shader/x-vertex">
//attribute声明vec3类型变量apos
attribute vec3 apos;
void main() {
    //顶点坐标apos赋值给内置变量gl_Position
    //逐顶点处理数据
    gl_Position = vec4(apos,1.0);
}
</script>
1
2
3
4
5
6
7
8
9
2
3
4
5
6
7
8
9
- 片元着色器代码
<script id="fragmentShader" type="x-shader/x-fragment">
void main() {
    // 逐片元处理数据,所有片元(像素)设置为红色
    gl_FragColor = vec4(1.0,0.0,0.0,1.0);
}
</script>
1
2
3
4
5
6
2
3
4
5
6
- javascript代码部分
WebGL上下文的获取
function init() {
	 const canvas = document.getElementById('WebGL');
    const gl = canvas.getContext('WebGL');
    //创建着色器程序
    const program = initShader(gl);
    const count= assignValue(gl,program);
    render(gl,count);
}
1
2
3
4
5
6
7
8- 声明初始化着色器函数
function initShader(gl) {
     //顶点着色器源码
    const vertexShaderSource = document.getElementById('vertexShader').innerText;
    //片元着色器源码
    const fragmentShaderSource = document.getElementById('fragmentShader').innerText;
	const vertexShader = gl.createShader(gl.VERTEX_SHADER);
	const fragmentShader = gl.createShader(gl.FRAGMENT_SHADER);
	gl.shaderSource(vertexShader, vertexShaderSource);
	gl.shaderSource(fragmentShader, fragmentShaderSource);
	gl.compileShader(vertexShader);
	gl.compileShader(fragmentShader);
	var program = gl.createProgram();
	gl.attachShader(program, vertexShader);
	gl.attachShader(program, fragmentShader);
	gl.linkProgram(program);
	gl.useProgram(program);
	return program;
}
1
2
3
4
5
6
7
8
9
10
11
12
13
14
15
16
17
18- 着色器代码变量赋值
// 定义组成矩形的4个三角形,共计6个顶点,左边三角形V0->V1->V2;下边三角形 V0->V4->V1;右边三角形 V0->V3->V4;上边三角形 V0->V4-V1 。
        const positions = new Float32Array([
            //V0
            -0.5, 0.5, 1.0, 1.0, 0.0, 1.0,
            //V1
            0.5, 0.5, 1.0, 0.0, 0.0, 1.0,
            //V2
            0.5, -0.5, 1.0, 1.0, 0.0, 1.0,
            //V3
            -0.5, 0.5, 1.0, 0.0, 0.0, 1.0,
            //V4
            0.5, -0.5, 0.0, 0.0, 1.0, 1.0,
            //V5
            -0.5, -0.5, 0.0, 1.0, 0.0, 1.0,
        ]);

        const a_Position = gl.getAttribLocation(program, 'a_Position');
        const a_Color = gl.getAttribLocation(program, 'a_Color');

        gl.enableVertexAttribArray(a_Position);
        gl.enableVertexAttribArray(a_Color);
        // 创建缓冲区
        let buffer = gl.createBuffer();
        // 绑定缓冲区为当前缓冲
        gl.bindBuffer(gl.ARRAY_BUFFER, buffer);
        // 设置 a_Position 属性从缓冲区读取数据方式
        gl.vertexAttribPointer(a_Position, 2, gl.FLOAT, false, 24, 0);
        // 设置 a_Color 属性从缓冲区读取数据方式
        gl.vertexAttribPointer(a_Color, 4, gl.FLOAT, false, 24, 8);
        // 向缓冲区传递数据
        gl.bufferData(gl.ARRAY_BUFFER, positions, gl.STATIC_DRAW);
        return positions.length / 6;
1
2
3
4
5
6
7
8
9
10
11
12
13
14
15
16
17
18
19
20
21
22
23
24
25
26
27
28
29
30
31
32WebGL渲染函数
function render(program, gl) {
	//获取顶点着色器的位置变量apos,即aposLocation指向apos变量。
	const aposLocation = gl.getAttribLocation(program, "apos");
	//类型数组构造函数Float32Array创建顶点数组
	const data = new Float32Array([
		-0.5,0.5,0.0,
		0.5,0.5,0.0,
		0.5,-0.5,0.0,
		-0.5,0.5,0.0,
		0.5,-0.5,0.0,
		-0.5,-0.5,0.0,
	]);
	//创建缓冲区对象
	const buffer = gl.createBuffer();
	//绑定缓冲区对象,激活buffer
	gl.bindBuffer(gl.ARRAY_BUFFER, buffer);
	//顶点数组data数据传入缓冲区
	gl.bufferData(gl.ARRAY_BUFFER, data, gl.STATIC_DRAW);
	//允许数据传递
	gl.enableVertexAttribArray(aposLocation);
	//缓冲区中的数据按照一定的规律传递给位置变量apos
	gl.vertexAttribPointer(aposLocation, 3, gl.FLOAT, false, 0, 0);
	//设置画布的颜色
	gl.clearColor(0.0, 0.0, 0.0, 0.3);
	gl.clear(gl.COLOR_BUFFER_BIT);
	//开始绘制图形  data.length/3表示顶顶数据的个数
	gl.drawArrays(gl.TRIANGLES, 0, data.length/3);
}
1
2
3
4
5
6
7
8
9
10
11
12
13
14
15
16
17
18
19
20
21
22
23
24
25
26
27
28
下面这几种绘制矩形的方式主要的不同在于数据构造及绘制方式上。
# 1、常规方式
- 数据构造
// 定义组成矩形的4个三角形,共计6个顶点
let positions = new Float32Array([
    //V0
    -0.5, 0.5, 1.0, 1.0, 0.0, 1.0,
    //V1
    0.5, 0.5, 1.0, 0.0, 0.0, 1.0,
    //V2
    0.5, -0.5, 1.0, 1.0, 0.0, 1.0,
    //V3
    -0.5, 0.5, 1.0, 0.0, 0.0, 1.0,
    //V4
    0.5, -0.5, 0.0, 0.0, 1.0, 1.0,
    //V5
    -0.5, -0.5, 0.0, 1.0, 0.0, 1.0,
]);
1
2
3
4
5
6
7
8
9
10
11
12
13
14
15
2
3
4
5
6
7
8
9
10
11
12
13
14
15
- 绘制方式
//开始绘制图形  data.length/3表示顶顶数据的个数
gl.drawArrays(gl.TRIANGLES, 0, data.length/3);
1
2
2
效果图如下:

# 2、三角形扇
这种绘制方式,绘制三角形时,绘制下一个三角形的前两个顶点,第一个顶点是确定的就三角形的第一个顶点,第二个顶点为上一个三角形的最后一个顶点。
- 数据构造
// 定义组成矩形的4个三角形,共计6个顶点
let positions = new Float32Array([
    //V0
    -0.5, 0.5, 1.0, 1.0, 0.0, 1.0,
    //V1
    0.5, 0.5, 1.0, 0.0, 0.0, 1.0,
    //V2
    0.5, -0.5, 1.0, 1.0, 0.0, 1.0,
    //V3
    -0.5, -0.5, 0.0, 1.0, 0.0, 1.0,
]);
1
2
3
4
5
6
7
8
9
10
11
2
3
4
5
6
7
8
9
10
11
- 绘制方式
//开始绘制图形  data.length/3表示顶顶数据的个数
gl.drawArrays(gl.TRIANGLE_FAN, 0, data.length/3);
1
2
2
效果图如下:
# 3、三角形带
这种绘制方式,绘制三角形时,绘制下一个三角形的前两个顶点为上一个三角形的后两个顶点。
- 数据构造
// 定义组成矩形的4个三角形,共计6个顶点
const positions = new Float32Array([
    //V0
    0.5, 0.5, 1.0, 0.0, 0.0, 1.0,
    //V1
    -0.5, 0.5, 1.0, 1.0, 0.0, 1.0,
    //V2
    0.5, -0.5, 1.0, 1.0, 0.0, 1.0,
    //V3
    -0.5, -0.5, 0.0, 1.0, 0.0, 1.0,
]);
1
2
3
4
5
6
7
8
9
10
11
2
3
4
5
6
7
8
9
10
11
- 绘制方式
//绘制方法 每一行6个数据
gl.drawArrays(gl.TRIANGLE_STRIP, 0, positions.length / 6);
1
2
2
效果图如下:
# 4、闭合线段
- 数据构造
// 定义组成矩形的4个顶点
const positions = new Float32Array([
    //V0
    0.5, 0.5, 1.0, 0.0, 0.0, 1.0,
    //V1
    -0.5, 0.5, 1.0, 1.0, 0.0, 1.0,
    //V2
    -0.5, -0.5, 0.0, 1.0, 0.0, 1.0,
    //V3
    0.5, -0.5, 1.0, 1.0, 0.0, 1.0,
]);
1
2
3
4
5
6
7
8
9
10
11
2
3
4
5
6
7
8
9
10
11
- 绘制方式
//绘制方法 每一行6个数据
gl.drawArrays(gl.LINE_LOOP, 0, positions.length/6);
1
2
2
# 5、顶点索引
顶点索引跟上面的区别在于缓冲区数据的构造及渲染方式不一样。
- 缓冲区的创建
//缓冲区的创建
function assignValue(gl, program) {
    // 定义组成矩形的4个三角形,共计6个顶点
    const positions = new Float32Array([
        //V0
        -0.5, 0.5, 1.0, 1.0, 0.0, 1.0,
        //V1
        0.5, 0.5, 1.0, 0.0, 0.0, 1.0,
        //V2
        0.5, -0.5, 1.0, 1.0, 0.0, 1.0,
        //v3
        -0.5, -0.5, 0.0, 1.0, 0.0, 1.0,
    ]);

    //创建顶点缓冲区对象
    let vertexBuffer = gl.createBuffer();
    gl.bindBuffer(gl.ARRAY_BUFFER, vertexBuffer);
    gl.bufferData(gl.ARRAY_BUFFER, positions, gl.STATIC_DRAW);

    const indexes = new Uint8Array([0, 1, 2, 0, 2, 3]);
    //创建索引缓冲区对象
    var indexesBuffer = gl.createBuffer();
    //绑定缓冲区对象
    gl.bindBuffer(gl.ELEMENT_ARRAY_BUFFER, indexesBuffer);
    //索引数组indexes数据传入缓冲区
    gl.bufferData(gl.ELEMENT_ARRAY_BUFFER, indexes, gl.STATIC_DRAW);
    let a_Position = gl.getAttribLocation(program, 'a_Position');
    let a_Color = gl.getAttribLocation(program, 'a_Color');
    gl.enableVertexAttribArray(a_Position);
    gl.enableVertexAttribArray(a_Color);

    // 设置 a_Position 属性从缓冲区读取数据方式
    gl.vertexAttribPointer(a_Position, 2, gl.FLOAT, false, 24, 0);
    // 设置 a_Color 属性从缓冲区读取数据方式
    gl.vertexAttribPointer(a_Color, 4, gl.FLOAT, false, 24, 8);
    return indexes.length;
}
1
2
3
4
5
6
7
8
9
10
11
12
13
14
15
16
17
18
19
20
21
22
23
24
25
26
27
28
29
30
31
32
33
34
35
36
37
2
3
4
5
6
7
8
9
10
11
12
13
14
15
16
17
18
19
20
21
22
23
24
25
26
27
28
29
30
31
32
33
34
35
36
37
- 绘制方式
//绘制方式 这个count表示 i索引数据的个数 count=indexes.length
gl.drawElements(gl.TRIANGLES, count, gl.UNSIGNED_BYTE, 0);
1
2
2
效果图如下:
参考
WebGL零基础入门教程(郭隆邦) (opens new window) WebGL 入门与实践 (opens new window) WebGL官方文档 (opens new window)